If you've followed the directions in my last post to setup the HP t5720 thin client as a Linux "appliance" then you should be ready to go for installing Asterisk. My personal experience is that the 1.2.x version of Asterisk is much more solid than the 1.4.x version. It's up to you which one you will install.
Despite some of the quirks in 1.4.x I'm going to install it so I can also install the Asterisk-GUI software. If this is going to be an "appliance" then the GUI could be a nice enhancement for the less technical Asterisk users.
So, lets get started.
Basic Asterisk Install
1. We need to install dependencies for Asterisk. Running "apt-get install gcc g++ make libncurses5-dev" should take care of it.
*I'm not using a zap interface, but f you're going to be using zaptel you need the kernel headers. There is plenty of documentation on the web for installing zap on Debian Etch. My two cents is that Zap is more trouble than it is worth in a production environment. Grab some Audiocodes gateways. More money, but you'll get a lot less calls and it is carrier class equipment so not as many late night phone calls for outage notifcations.
2. Download and unzip the source code for Asterisk.
3. From the Asterisk directory run a "./configure", then "make", then "make install", then "make samples", then "make config". You should be able to run "asterisk -cvvvv" from the console and watch asterisk start up. From here on out the Asterisk configuration is really up to you because everyone's needs are different. Setup a few phones and start passing calls.
As a suggestion, if you were going to use this as your sole pbx on this platform it may be best to stick a usb thumb drive in the back and store your media, prompts and voicemail on there or mount an NFS share.
To install Asterisk-GUI
1. As of now you can only get Asterisk-GUI using svn. That means we have to install the subversion client with "apt-get install subversion subversion-tools".
2. To checkout the source run "svn checkout http://svn.digium.com/svn/asterisk-gui/trunk asterisk-gui".
3. Rather than duplicate efforts, you can find the rest of the instructions to install Asterisk-GUI at http://astrecipes.net/?n=217. It is worth noting that in my experience if you don't setup zaptel you can't use the configuration wizard in the GUI.
Thursday, September 6, 2007
Build your own Linux/Asterisk/dhcpd/bind/whatever-you-want "Appliance"
The whole concept of the linux appliance has been interesting to watch evolve. Open source software has led to a huge array of devices that companies may not have had the resource to develop, were it not for freely available source code for operating systems, network stacks and a variety of other things.
I've been searching for appliance hardware for some time now to help me with needs we have for providing services to branch offices. We're trying to cut our technology start up costs and reduce the amount of bandwidth we need to provide to these locations. We've tackled the bandwidth problem by switching to a terminal service based model. Not only has this allowed us to lower bandwidth substantially, but we can also purchase thin client hardware which is cheaper, has a longer duty cycle than a pc and is more secure since no files can be stored on the local client.
The next challenge is the architecture hardware at each branch office. The office's need to be somewhat survivable. If the WAN connection goes down the phones, pc's and thin client stations need to be able to operate. This means dns, dhcp and VoIP need to remain active. In the past we would do this with a VoIP server and a Windows Domain controller. The solution works, but it requires a bigger UPS as well as two servers which generate heat, have moving parts that can fail and are expensive. If a branch office only has 10-30 people in it and all are using TS do we really need that kind of horsepower?
So, I've been looking for a solid state appliance that I could use to provide backup services at each of these locations. I have a few requirements that may or may not apply to other people but they are important in the environment I'm in. The device had to have no fans or disks. It had to be something mass produced (I can't order a run of custom appliances). It should be able to run a standard linux distribution (no need to retrain employees on custom distros). It should be relatively inexpensive. Also, it would be nice (not a requirement) if it had an expansion slot.
Now a lot of people hack Linksys routers and other off the shelf equipment like that. I think it is great and a wonderful application, but it would never be taken seriously as a solution in the corporate environment I work in.
I've searched the Internet off and on for months with no luck finding what I was looking for. Then one day I was walking through my Tech Support office and it hit me. The very same HP thin client devices we were deploying for our end users may meet all of my requirements. They are available from the factory with Debian installed so Linux should be possible and they have an optional pci slot if we needed expansion. Perhaps this was the answer I was looking for. I Googled around to try to find a starting point, surely someone has done this before me, but I found nothing. If you know of any links please post them as a resource for others who may find this article!
So, to document for myself (I'm forgetful at times) I've posted my instructions here. Hopefully they can help other people too. I'm no Linux guru but I can pretty much figure out whatever I put my mind (and time) in to. I'm hoping that by putting this out here other people who are more knowledgeable than myself will collaborate and improve this platform.
One last note. Remember, this is to run a branch office or a small business, not a multi building campus. If you want to run a substantial amount of phones on one of these you should look into OpenSER or SER. I've installed both on these devices and it works fine.
Hardware
I'm using what we had in stock at work, but there are a variety of models. My philosophy is that an extra $100 for more features is cheaper than struggling through trying to make a less standard installation work on less capable hardware. Like I said, I'm no Linux guru so it is just plain easier to spend $100 rather than roll my own distro of Linux.
I have two thin client devices that are both made by Hewlett Packard, model t5720. One has 512 MB of flash and 256 MB of RAM while the other has 1 GB of flash, 512 MB RAM and the add on PCI slot riser. Both have a pci slot but it requires a riser kit that includes a wider case cover to make room for a card (about $35). Both machines only have a flash drive rather than a spinning hard drive and there is a "radiator" that runs around the unit to negate the need for a spinning fan. Simply put, the devices are solid state with no moving parts, 6 usb ports, audio in/out, ps2 for keyboard and mouse, parallel port, serial port, ethernet port and a video port.


Without riser card extension the case is roughly 4.5"x9.5"x10.5"
You can buy them wherever you like. I like CDW because they have a good selection of accessories for them and they are one of our preferred vendors at work anyway. They are available with XP embedded or Debian Linux. The ones with XP have more available RAM and Flash. If you can't stand giving Bill another dollar you could buy a Debian one and upgrade the RAM and Flash, but it will be more expensive in the long run.
Operating System
I've always used Red Hat based distros like RHEL, CentOS or Fedora. The problem with these distributions became apparent to me when I started installing them on the t5720 that only has 512 MB of Flash. They're very bloated, even if you turn off all options you can't get Fedora 7 to install. I was going to have to venture into the unknown, but I really wanted to keep a mainline distribution. Damn Small Linux ran great, but there isn't an easy way to install the additional software I needed. I think for the future getting DSL to run on these with some server apps like Asterisk would really be killer, but I don't have time to learn all of that right now.
I finally ended up settling on Debian Etch. Oh boy, another packaging system and file structure to learn (heavy sarcasm). Funny thing is, once I got to using it I really liked it. Here are the steps I took.
1. Download the Debian Etch netinst CD image. At the time of this posting it was located here. The netinst CD will install the basics to get Etch up and running. Since we are pressed for disk space, this is the best option. Gotta leave luxuries behind. Truth be told, even the netinst install is a bit bloated for our application but it is a standard and well known Linux distro so it should keep the learning curve down.
2. Burn the .iso image to a CD. Then scare up a usb CD-ROM drive that you can plug in to the t5720. If you know how to build a bootable usb thumb drive then you could go that route instead, but that left me nothing but frustration. You could also do a pxe network install if you know how.
3. Plug in your usb CD-ROM drive and put the Debian netinst CD in. Turn on the t5720. When the POST screen comes up, hit F10 to go into bios setup. Go into "Advanced CMOS features" and make sure that the first boot device is USB. Then go back to the main menu and choose "Power Management Setup". Set the PWRON After PWR-Fail to "On". If there is a power failure longer than UPS backup can handle at the branch office (or wherever you deploy your appliance) we want the appliance to boot once power is restored. Now hit F10 to save your preferences and exit.
4. I'm assuming some skill level here so I won't go into terrible detail. When the Debian startup screen comes up just hit Enter to boot. You will then be asked for your language and territory settings, so enter what is appropriate. Setup your hostname and domain. When it comes to disk partitioning you will have to do it manually if you only have a 512 MB flash drive. If you have the 1 GB Flash drive you can accept the defaults. From here on out you can do whatever you like until you come to the "Configure the package manager" screen.
5. At the "Configure the package manager" choose to use a mirror. I suggest you use the ftp.debian.org mirror because I got errors about the architecture not being supported at other mirrors. I choose no on the package survey option, mostly just to keep as many bytes of Flash free as possible (every little bit helps). At the software selection screen I choose absolutely nothing (uncheck "Standard system"). If I need something I'll install it later. Again, keep as many bytes of Flash free as we can.
6. Let grub install on the master boot record so Debian can, well, boot. After that the CD should eject, the appliance will reboot.
7. To finish the OS install I have to do a couple things. First, assign a static ip address. This can be done in /etc/network/interfaces. Again, I assume some Linux experience so I assume you know how to use a text editor. I changed this:
iface eth0 inet dhcp
to this:
iface eth0 inet static
address 10.1.1.10
netmask 255.255.255.0
gateway 10.1.1.1
Obviously you need to use the appropriate ip settings for your network. All of the documentation I have read says you can just do a "/etc/init.d/networking restart" at this point, but my experience is that eth0 doesn't release the dhcp ip address. It's easy enough to fix with a reboot so I just do that once I'm ready.
8. Since you are now off of DHCP make sure your dns settings are right. They are stored in /etc/resolv.conf. Mine looks like this:
search mydomain.com
nameserver 10.1.1.30
nameserver 10.2.1.20
9. The next thing I do is remove the CD ROM as a source for package installation. If I have this appliance 400 miles away the last thing I want to do is need a CD-ROM drive plugged in and have the netinst CD on hand. This is done in /etc/apt/sources.list. I simply comment out the line that starts with "deb cdrom:" by putting a # in front of it. Then I run apt-get update to save the new repository settings.
10. Now, I install the openssh-server package with "apt-get install openssh-server" since it isn't part of the netinst CD install. Once this is done I perform the rest of the configuration from PuTTy (remember, we're mostly a Windows shop).
11. The last step is that I run a "df -h" to see how much hard drive space I have. Initially I have 523 MB left. After running "apt-get clean" I have 563 MB. This is quite enough to run a couple network services on and then some.
You now have a working Debian Etch server on a solid state "appliance". Heck, it's even branded with the HP name so people who insist on no whitebox servers can't even argue with you ;-) Now you just have to decide which services you want it to host. I'll be installing Asterisk, dhcpd and bind in future posts. You can pick and choose from what I have done or go in a totally different direction. If you need additional hardware you can insert a PCI card or plug in a USB device. You can view this post to see how I installed Asterisk on the t5720.
I've been searching for appliance hardware for some time now to help me with needs we have for providing services to branch offices. We're trying to cut our technology start up costs and reduce the amount of bandwidth we need to provide to these locations. We've tackled the bandwidth problem by switching to a terminal service based model. Not only has this allowed us to lower bandwidth substantially, but we can also purchase thin client hardware which is cheaper, has a longer duty cycle than a pc and is more secure since no files can be stored on the local client.
The next challenge is the architecture hardware at each branch office. The office's need to be somewhat survivable. If the WAN connection goes down the phones, pc's and thin client stations need to be able to operate. This means dns, dhcp and VoIP need to remain active. In the past we would do this with a VoIP server and a Windows Domain controller. The solution works, but it requires a bigger UPS as well as two servers which generate heat, have moving parts that can fail and are expensive. If a branch office only has 10-30 people in it and all are using TS do we really need that kind of horsepower?
So, I've been looking for a solid state appliance that I could use to provide backup services at each of these locations. I have a few requirements that may or may not apply to other people but they are important in the environment I'm in. The device had to have no fans or disks. It had to be something mass produced (I can't order a run of custom appliances). It should be able to run a standard linux distribution (no need to retrain employees on custom distros). It should be relatively inexpensive. Also, it would be nice (not a requirement) if it had an expansion slot.
Now a lot of people hack Linksys routers and other off the shelf equipment like that. I think it is great and a wonderful application, but it would never be taken seriously as a solution in the corporate environment I work in.
I've searched the Internet off and on for months with no luck finding what I was looking for. Then one day I was walking through my Tech Support office and it hit me. The very same HP thin client devices we were deploying for our end users may meet all of my requirements. They are available from the factory with Debian installed so Linux should be possible and they have an optional pci slot if we needed expansion. Perhaps this was the answer I was looking for. I Googled around to try to find a starting point, surely someone has done this before me, but I found nothing. If you know of any links please post them as a resource for others who may find this article!
So, to document for myself (I'm forgetful at times) I've posted my instructions here. Hopefully they can help other people too. I'm no Linux guru but I can pretty much figure out whatever I put my mind (and time) in to. I'm hoping that by putting this out here other people who are more knowledgeable than myself will collaborate and improve this platform.
One last note. Remember, this is to run a branch office or a small business, not a multi building campus. If you want to run a substantial amount of phones on one of these you should look into OpenSER or SER. I've installed both on these devices and it works fine.
Hardware
I'm using what we had in stock at work, but there are a variety of models. My philosophy is that an extra $100 for more features is cheaper than struggling through trying to make a less standard installation work on less capable hardware. Like I said, I'm no Linux guru so it is just plain easier to spend $100 rather than roll my own distro of Linux.
I have two thin client devices that are both made by Hewlett Packard, model t5720. One has 512 MB of flash and 256 MB of RAM while the other has 1 GB of flash, 512 MB RAM and the add on PCI slot riser. Both have a pci slot but it requires a riser kit that includes a wider case cover to make room for a card (about $35). Both machines only have a flash drive rather than a spinning hard drive and there is a "radiator" that runs around the unit to negate the need for a spinning fan. Simply put, the devices are solid state with no moving parts, 6 usb ports, audio in/out, ps2 for keyboard and mouse, parallel port, serial port, ethernet port and a video port.


Without riser card extension the case is roughly 4.5"x9.5"x10.5"
You can buy them wherever you like. I like CDW because they have a good selection of accessories for them and they are one of our preferred vendors at work anyway. They are available with XP embedded or Debian Linux. The ones with XP have more available RAM and Flash. If you can't stand giving Bill another dollar you could buy a Debian one and upgrade the RAM and Flash, but it will be more expensive in the long run.
Operating System
I've always used Red Hat based distros like RHEL, CentOS or Fedora. The problem with these distributions became apparent to me when I started installing them on the t5720 that only has 512 MB of Flash. They're very bloated, even if you turn off all options you can't get Fedora 7 to install. I was going to have to venture into the unknown, but I really wanted to keep a mainline distribution. Damn Small Linux ran great, but there isn't an easy way to install the additional software I needed. I think for the future getting DSL to run on these with some server apps like Asterisk would really be killer, but I don't have time to learn all of that right now.
I finally ended up settling on Debian Etch. Oh boy, another packaging system and file structure to learn (heavy sarcasm). Funny thing is, once I got to using it I really liked it. Here are the steps I took.
1. Download the Debian Etch netinst CD image. At the time of this posting it was located here. The netinst CD will install the basics to get Etch up and running. Since we are pressed for disk space, this is the best option. Gotta leave luxuries behind. Truth be told, even the netinst install is a bit bloated for our application but it is a standard and well known Linux distro so it should keep the learning curve down.
2. Burn the .iso image to a CD. Then scare up a usb CD-ROM drive that you can plug in to the t5720. If you know how to build a bootable usb thumb drive then you could go that route instead, but that left me nothing but frustration. You could also do a pxe network install if you know how.
3. Plug in your usb CD-ROM drive and put the Debian netinst CD in. Turn on the t5720. When the POST screen comes up, hit F10 to go into bios setup. Go into "Advanced CMOS features" and make sure that the first boot device is USB. Then go back to the main menu and choose "Power Management Setup". Set the PWRON After PWR-Fail to "On". If there is a power failure longer than UPS backup can handle at the branch office (or wherever you deploy your appliance) we want the appliance to boot once power is restored. Now hit F10 to save your preferences and exit.
4. I'm assuming some skill level here so I won't go into terrible detail. When the Debian startup screen comes up just hit Enter to boot. You will then be asked for your language and territory settings, so enter what is appropriate. Setup your hostname and domain. When it comes to disk partitioning you will have to do it manually if you only have a 512 MB flash drive. If you have the 1 GB Flash drive you can accept the defaults. From here on out you can do whatever you like until you come to the "Configure the package manager" screen.
5. At the "Configure the package manager" choose
6. Let grub install on the master boot record so Debian can, well, boot. After that the CD should eject, the appliance will reboot.
7. To finish the OS install I have to do a couple things. First, assign a static ip address. This can be done in /etc/network/interfaces. Again, I assume some Linux experience so I assume you know how to use a text editor. I changed this:
iface eth0 inet dhcp
to this:
iface eth0 inet static
address 10.1.1.10
netmask 255.255.255.0
gateway 10.1.1.1
Obviously you need to use the appropriate ip settings for your network. All of the documentation I have read says you can just do a "/etc/init.d/networking restart" at this point, but my experience is that eth0 doesn't release the dhcp ip address. It's easy enough to fix with a reboot so I just do that once I'm ready.
8. Since you are now off of DHCP make sure your dns settings are right. They are stored in /etc/resolv.conf. Mine looks like this:
search mydomain.com
nameserver 10.1.1.30
nameserver 10.2.1.20
9. The next thing I do is remove the CD ROM as a source for package installation. If I have this appliance 400 miles away the last thing I want to do is need a CD-ROM drive plugged in and have the netinst CD on hand. This is done in /etc/apt/sources.list. I simply comment out the line that starts with "deb cdrom:" by putting a # in front of it. Then I run apt-get update to save the new repository settings.
10. Now, I install the openssh-server package with "apt-get install openssh-server" since it isn't part of the netinst CD install. Once this is done I perform the rest of the configuration from PuTTy (remember, we're mostly a Windows shop).
11. The last step is that I run a "df -h" to see how much hard drive space I have. Initially I have 523 MB left. After running "apt-get clean" I have 563 MB. This is quite enough to run a couple network services on and then some.
You now have a working Debian Etch server on a solid state "appliance". Heck, it's even branded with the HP name so people who insist on no whitebox servers can't even argue with you ;-) Now you just have to decide which services you want it to host. I'll be installing Asterisk, dhcpd and bind in future posts. You can pick and choose from what I have done or go in a totally different direction. If you need additional hardware you can insert a PCI card or plug in a USB device. You can view this post to see how I installed Asterisk on the t5720.
Saturday, March 3, 2007
Propagating Asterisk MWI Across Multiple Servers
My experience with any type of technology is to get one thing working at a time. If you're relatively new to Asterisk I would suggest taking that approach with centralizing voicemail services. Get centralized voicemail working, then tackle MWI. If you're inexperienced with these concepts it could create a troubleshooting nightmare.
If you followed my last posting you've got centralized voicemail working. People can transfer messages across the organization regardless of what server their phone is registered to. Sooner or later (probably right away) you're going to want the Message Waiting Indicator (MWI) to start working.
Since Asterisk doesn't natively provide the ability to centralize voicemail it makes sense that it doesn't offer the ability to deploy MWI across multiple servers. Now, you could get in the source code and start hacking around, but that is overkill. With a better-than-newbie understanding of how voicemail and MWI services in Asterisk work, you can put together a solution to set the MWI on any phone in your organization, regardless of what server it is registered to.
There are a couple of things to understand about Asterisk voicemail and MWI:
, I use a simple call over IAX. I really like this solution because I only have to maintain one type of connection and I don't have to setup ssh keys. If you happen to trunk your servers with SIP you could use that as well. The method I use is pretty much protocol agnostic.
I figured that I need to pass those three parameters to each of my non-voicemail servers: context, extension, number of messages. I googled around to see if I could set variables in IAX and pass them in a call. I found a lot of people requesting that ability, but didn't see the ability to actually do it. I thought about switching to SIP and setting custom headers, but that meant I would have to have an IAX trunk and a SIP trunk between each of my servers. I considered cramming all of the variables into the extension and parsing them out on the other side. Then it occurred to me that there is a way I could send three separate pieces of information without having to parse them on the other end. Here is what I ended up with:
Extension = Extension (aka voicemail box)
CallerIDName = Context
CallerIDNum = Number of Messages
It sounds like an ugly hack, but to me all that matters is that it works. All you need to transfer the status of a voicemail box between servers is a split second phone call.
Connecting the Servers
Since we are going to use a call from the voicemail server to the phone registration server to send the MWI status, you will need to create trunks that allow calls from your voicemail server to your phone registration servers. I prefer to associate these trunks with a seperate context called "setmwi". As I said before, creating an IAX trunk has been tutorialed to death, so I'm not going to waste the bits. Here is a diagram of the way I would do it.

Voicemail Server Configuration
Lets start with the externnotify script. When this script kicks off I want it to do the following
My externnotify script creates .call files that accomplish the above objectives. For more info on .call files see the "Asterisk autodial out" page at the voip-info wiki. The script, which I've named notify_mwi.sh, is as follows:
#!/bin/bash
CONTEXT=$1
EXTEN=$2
NUMVMS=$3
cat < /var/spool/asterisk/1$EXTEN
Channel:IAX2/toDenver/$EXTEN
CallerID: $CONTEXT<$NUMVMS>
MaxRetries: 0
Extension: send
Context: notifymwi
Priority: 1
EOF
mv /var/spool/asterisk/1$EXTEN /var/spool/asterisk/outgoing
cat < /var/spool/asterisk/2$EXTEN
Channel:IAX2/toCSprings/$EXTEN
CallerID: $CONTEXT<$NUMVMS>
MaxRetries: 0
Extension: send
Context: notifymwi
Priority: 1
EOF
mv /var/spool/asterisk/2$EXTEN /var/spool/asterisk/outgoing
Create as many .call files as you have servers to notify. You'll notice that if the call connects successfully it passes it off to the local extension "send" in the context "notifymwi" on the voicemail server. This is really just a dummy extension on the voicemail server so that the call can be successfully connected. In extensions.conf the dummy extension looks like this:
[notifymwi]
exten => send,1,Answer
exten => send,2,wait(3) ;the other end will hangup fast anyway
exten => send,3,Hangup
Phone Registration Servers Configurations
I use the exact script to create and remove msgxxx.txt files that is posted at http://asterisk.mdaniel.net/?p=14. I don't want to take any credit I don't deserve!
Based upon the variables sent, the script creates the appropriate folders and msgxxx.txt files. If there is no voicemail, the script deletes any existing msgxxx.txt files. It looks like this:
#!/bin/bash
CONTEXT=$1
EXTEN=$2
NUMVMS=$3
NOCMD="rm -f /var/spool/asterisk/voicemail/$CONTEXT/$EXTEN/INBOX/*"
CREATECMD="mkdir -p /var/spool/asterisk/voicemail/$CONTEXT/$EXTEN/INBOX"
if [[ $NUMVMS = "0" ]]; then
$NOCMD
else
$NOCMD
$CREATECMD
for ((count = 1; count <= $NUMVMS; count++)); do
TOUCHCMD="touch /var/spool/asterisk/voicemail/$CONTEXT/$EXTEN/INBOX/msg$count.txt"
$TOUCHCMD
done
fi
Now we have to run the script when the voicemail server calls the phone registration servers. If configured properly, the IAX trunk is associated with the "setmwi" context. Utilizing the System() command, I can call the set_mwi.sh script when a call comes in to the "setmwi" context. Here is the entry in extensions.conf. All of the voicemail boxes in my scenario are four digit extensions so you may have to tweak this a bit depending on your specific application.
[setmwi]
exten => _XXXX,1,Answer
exten => _XXXX,2,System(/usr/local/bin/set_mwi.sh ${CALLERIDNAME} ${EXTEN} ${CALLERIDNUM})
exten => _XXXX,3,Hangup
Conclusion
That should be it. Leave a few voicemails and watch the "magic" happen. If you wanted to get fancy you could figure out a way to have the voicemail server only call the proper phone registration servers. To me it wasn't worth the complexity since the msgxxx.txt files don't take up much space and a half a second call doesn't take much bandwidth. Also, we have the same extension on multiple servers sometimes so it wouldn't be worth the administrative work to keep track of everything.
If you have any suggestions or refinements I would love to hear the feedback. Thanks!
*I should note that I have heard of some people using NFS to mount the voicemail directory from the voicemail server onto the voicemail directory of the phone registration servers. This allows the phone registration servers to see when a voicemail is left and the MWI gets set as it would normally. Depending on your environment, this may be a viable solution as well. Gotta love flexibility.
If you followed my last posting you've got centralized voicemail working. People can transfer messages across the organization regardless of what server their phone is registered to. Sooner or later (probably right away) you're going to want the Message Waiting Indicator (MWI) to start working.
Since Asterisk doesn't natively provide the ability to centralize voicemail it makes sense that it doesn't offer the ability to deploy MWI across multiple servers. Now, you could get in the source code and start hacking around, but that is overkill. With a better-than-newbie understanding of how voicemail and MWI services in Asterisk work, you can put together a solution to set the MWI on any phone in your organization, regardless of what server it is registered to.
There are a couple of things to understand about Asterisk voicemail and MWI:
- MWI is turned on or off by the presence of a msgxxx.txt file in the INBOX directory for a given voicemail box (see http://asterisk.mdaniel.net/?p=14, and http://www.voip-info.org/wiki/view/Asterisk+MWI)
- The "externnotify=" option in voicemail.conf allows you to run a program or script whenever a voicemail is received and also when someone exits the VoiceMailMain() application
- When "externnotify" is processed it passes the context, extension and number of messages to the program or script you specify
I figured that I need to pass those three parameters to each of my non-voicemail servers: context, extension, number of messages. I googled around to see if I could set variables in IAX and pass them in a call. I found a lot of people requesting that ability, but didn't see the ability to actually do it. I thought about switching to SIP and setting custom headers, but that meant I would have to have an IAX trunk and a SIP trunk between each of my servers. I considered cramming all of the variables into the extension and parsing them out on the other side. Then it occurred to me that there is a way I could send three separate pieces of information without having to parse them on the other end. Here is what I ended up with:
Extension = Extension (aka voicemail box)
CallerIDNum = Number of Messages
It sounds like an ugly hack, but to me all that matters is that it works. All you need to transfer the status of a voicemail box between servers is a split second phone call.
Connecting the Servers
Since we are going to use a call from the voicemail server to the phone registration server to send the MWI status, you will need to create trunks that allow calls from your voicemail server to your phone registration servers. I prefer to associate these trunks with a seperate context called "setmwi". As I said before, creating an IAX trunk has been tutorialed to death, so I'm not going to waste the bits. Here is a diagram of the way I would do it.

Lets start with the externnotify script. When this script kicks off I want it to do the following
gather the extension, context, and number of messages variables set those variables into the extension, calleridname and calleridnum of an IAX call to my phone registration servers - kick off the calls to my phone registration servers
#!/bin/bash
CONTEXT=$1
EXTEN=$2
NUMVMS=$3
cat <
Channel:IAX2/toDenver/$EXTEN
CallerID: $CONTEXT<$NUMVMS>
MaxRetries: 0
Extension: send
Context: notifymwi
Priority: 1
EOF
mv /var/spool/asterisk/1$EXTEN /var/spool/asterisk/outgoing
cat <
Channel:IAX2/toCSprings/$EXTEN
CallerID: $CONTEXT<$NUMVMS>
MaxRetries: 0
Extension: send
Context: notifymwi
Priority: 1
EOF
mv /var/spool/asterisk/2$EXTEN /var/spool/asterisk/outgoing
Create as many .call files as you have servers to notify. You'll notice that if the call connects successfully it passes it off to the local extension "send" in the context "notifymwi" on the voicemail server. This is really just a dummy extension on the voicemail server so that the call can be successfully connected. In extensions.conf the dummy extension looks like this:
[notifymwi]
exten => send,1,Answer
exten => send,2,wait(3) ;the other end will hangup fast anyway
exten => send,3,Hangup
Phone Registration Servers Configurations
I use the exact script to create and remove msgxxx.txt files that is posted at http://asterisk.mdaniel.net/?p=14. I don't want to take any credit I don't deserve!
Based upon the variables sent, the script creates the appropriate folders and msgxxx.txt files. If there is no voicemail, the script deletes any existing msgxxx.txt files. It looks like this:
#!/bin/bash
CONTEXT=$1
EXTEN=$2
NUMVMS=$3
NOCMD="rm -f /var/spool/asterisk/voicemail/$CONTEXT/$EXTEN/INBOX/*"
CREATECMD="mkdir -p /var/spool/asterisk/voicemail/$CONTEXT/$EXTEN/INBOX"
if [[ $NUMVMS = "0" ]]; then
$NOCMD
else
$NOCMD
$CREATECMD
for ((count = 1; count <= $NUMVMS; count++)); do
TOUCHCMD="touch /var/spool/asterisk/voicemail/$CONTEXT/$EXTEN/INBOX/msg$count.txt"
$TOUCHCMD
done
fi
Now we have to run the script when the voicemail server calls the phone registration servers. If configured properly, the IAX trunk is associated with the "setmwi" context. Utilizing the System() command, I can call the set_mwi.sh script when a call comes in to the "setmwi" context. Here is the entry in extensions.conf. All of the voicemail boxes in my scenario are four digit extensions so you may have to tweak this a bit depending on your specific application.
[setmwi]
exten => _XXXX,1,Answer
exten => _XXXX,2,System(/usr/local/bin/set_mwi.sh ${CALLERIDNAME} ${EXTEN} ${CALLERIDNUM})
exten => _XXXX,3,Hangup
Conclusion
That should be it. Leave a few voicemails and watch the "magic" happen. If you wanted to get fancy you could figure out a way to have the voicemail server only call the proper phone registration servers. To me it wasn't worth the complexity since the msgxxx.txt files don't take up much space and a half a second call doesn't take much bandwidth. Also, we have the same extension on multiple servers sometimes so it wouldn't be worth the administrative work to keep track of everything.
If you have any suggestions or refinements I would love to hear the feedback. Thanks!
*I should note that I have heard of some people using NFS to mount the voicemail directory from the voicemail server onto the voicemail directory of the phone registration servers. This allows the phone registration servers to see when a voicemail is left and the MWI gets set as it would normally. Depending on your environment, this may be a viable solution as well. Gotta love flexibility.
Thursday, March 1, 2007
Centralizing Asterisk Voicemail Services
* This posting assumes you are somewhat familiar with Asterisk. You should be able to setup Asterisk, register a few phones, and make calls inbetween them. You also should be familiar with interconnecting two or more Asterisk servers via SIP or IAX.
One of the challenges of deploying Asterisk in an enterprise with multiple locations is voicemail. If the local Voicemail() application is used at each site mailboxes will scattered across multiple servers. Users won't be able transfer voicemail to users outside of their server, several numbers will be needed to call in to retrieve voicemail, and if a web interface to retrieve voicemail is to be used several web addresses will need to be maintained. Additionally, if the WAN links are low bandwidth the backup of voicemail data to the main site could be very slow.
Centralizing voicemail services can help solve these problems. There is no configuration setting to have Asterisk utilize another server for voicemail services, but it can be easily configured through the dialplan. This question comes up from time to time on the listserv (once asked by me), so I figured I would document the solution I used.
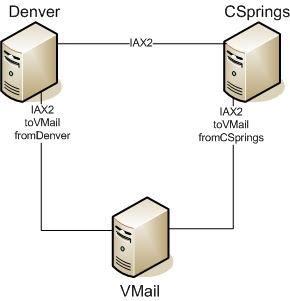
The first step is to create connections from the various servers that need voicemail services to the server that will act as the centralized voicemail server. For a company with locations in Denver and Colorado Springs it will look something like the diagram below. It doesn't matter if you use IAX or SIP. There are plenty of "How To's" on how to trunk multiple servers together so I'm not going to re-invent that tutorial wheel.
Ok, now that you have your phone servers connected to the voicemail server it's time to tell the phone server to send unanswered or busy calls to the voicemail server. This is accomplished by making two small changes to the stdexten macro in extensions.conf.
Change this:
exten => s-NOANSWER,1,Voicemail(u${ARG1})
exten => s-NOANSWER,2,Goto(default,s,1)
exten => s-BUSY,1,Voicemail(b${ARG1})
exten => s-BUSY,2,Goto(default,s,1)
To this (I've named the IAX connection to the voicemail server "toVMail"):
exten => s-NOANSWER,1,Dial(IAX2/toVMail/u${ARG1})
exten => s-NOANSWER,2,Goto(default,s,1)
exten => s-BUSY,1,Dial(IAX2/toVMail/b${ARG1})
exten => s-BUSY,2,Goto(default,s,1)
We're now sending our busy and unanswered calls to the central voicemail server, but they have nothing to do once they get there. We need to create some extensions so we can send the incoming calls to the Voicemail application. Put the following lines in extensions.conf of the voicemail server. Be sure to put them under the context that your server to server trunks are located in. I'm using a context called "incoming". Also note that I'm only using four digit extensions. Adjust for your application as needed.
[incoming]
exten => _bXXXX,1,Voicemail(${EXTEN}@default)
exten => _uXXXX,1,Voicemail(${EXTEN}@default)
Next an entry to allow people to call in and retrieve voicemail. I also put this under the "incoming" context and have designated the extension as 4000.
exten => 4000,1,VoiceMailMain(@default)
Be sure to setup the mailboxes you wish to host in voicemail.conf or by using the realtime architecture.
Lastly, don't forget to setup your phone servers to send extension 4000 to the voicemail sever. Make some test calls to be sure everything is working.
Please note that the Message Waiting Indicator, aka MWI, will not work on your phones. Turning MWI on and off works between the phone and the server it is registered to. Never fear though, there are some tricks to make this happen that I'll go over in a later posting when I'm not so tired.
One of the challenges of deploying Asterisk in an enterprise with multiple locations is voicemail. If the local Voicemail() application is used at each site mailboxes will scattered across multiple servers. Users won't be able transfer voicemail to users outside of their server, several numbers will be needed to call in to retrieve voicemail, and if a web interface to retrieve voicemail is to be used several web addresses will need to be maintained. Additionally, if the WAN links are low bandwidth the backup of voicemail data to the main site could be very slow.
Centralizing voicemail services can help solve these problems. There is no configuration setting to have Asterisk utilize another server for voicemail services, but it can be easily configured through the dialplan. This question comes up from time to time on the listserv (once asked by me), so I figured I would document the solution I used.
The first step is to create connections from the various servers that need voicemail services to the server that will act as the centralized voicemail server. For a company with locations in Denver and Colorado Springs it will look something like the diagram below. It doesn't matter if you use IAX or SIP. There are plenty of "How To's" on how to trunk multiple servers together so I'm not going to re-invent that tutorial wheel.

Ok, now that you have your phone servers connected to the voicemail server it's time to tell the phone server to send unanswered or busy calls to the voicemail server. This is accomplished by making two small changes to the stdexten macro in extensions.conf.
Change this:
exten => s-NOANSWER,1,Voicemail(u${ARG1})
exten => s-NOANSWER,2,Goto(default,s,1)
exten => s-BUSY,1,Voicemail(b${ARG1})
exten => s-BUSY,2,Goto(default,s,1)
To this (I've named the IAX connection to the voicemail server "toVMail"):
exten => s-NOANSWER,1,Dial(IAX2/toVMail/u${ARG1})
exten => s-NOANSWER,2,Goto(default,s,1)
exten => s-BUSY,1,Dial(IAX2/toVMail/b${ARG1})
exten => s-BUSY,2,Goto(default,s,1)
We're now sending our busy and unanswered calls to the central voicemail server, but they have nothing to do once they get there. We need to create some extensions so we can send the incoming calls to the Voicemail application. Put the following lines in extensions.conf of the voicemail server. Be sure to put them under the context that your server to server trunks are located in. I'm using a context called "incoming". Also note that I'm only using four digit extensions. Adjust for your application as needed.
[incoming]
exten => _bXXXX,1,Voicemail(${EXTEN}@default)
exten => _uXXXX,1,Voicemail(${EXTEN}@default)
Next an entry to allow people to call in and retrieve voicemail. I also put this under the "incoming" context and have designated the extension as 4000.
exten => 4000,1,VoiceMailMain(@default)
Be sure to setup the mailboxes you wish to host in voicemail.conf or by using the realtime architecture.
Lastly, don't forget to setup your phone servers to send extension 4000 to the voicemail sever. Make some test calls to be sure everything is working.
Please note that the Message Waiting Indicator, aka MWI, will not work on your phones. Turning MWI on and off works between the phone and the server it is registered to. Never fear though, there are some tricks to make this happen that I'll go over in a later posting when I'm not so tired.
Learning is so much fun
The whole open source movement has been intriguing me since about 1997. I had a linux PC in my house that I used to browse the web, firewall my Cable modem, and perform NAT (before the days of a Linksys Router in every home), but thats as far as it went. It was for curiosity, not for anything mission critical.
A few years ago I saw the light that many OSS solutions were a true business grade solution and not just for hobbyists. I might have been late to the party, but I'm here now.
Anyway, as a newbie it is frustrating to struggle through things and figure them out. So, as a way of giving back (and so I don't forget my own solutions) I decided to throw up this blog. Who knows, maybe I'll put up two things and that will be it or maybe it will continue to grow. Either way it should serve some purpose.
Please feel free to leave comments and send questions. If I've done something that isn't the optimal way, I'd love the feedback!
Subscribe to:
Posts (Atom)